Make sure the following warnings and cautions have been read and fully understood before changing a wheel. Failure to follow the guidance could result in vehicle damage, serious injury, or death.
Make sure the relevant safety warnings have been read and fully understood before changing a wheel. See WHEEL CHANGING SAFETY.
Disconnect any trailer or caravan from the vehicle.
The standard vehicle jacking points are obscured on vehicles with deployable side steps, fixed side steps, or side tubes. A secondary set of jacking points are located adjacent to the standard vehicle jacking points. Use the secondary jacking points when jacking the vehicle. See SIDE STEPS AND TUBES.
Vehicles supplied with a spare tire have a wheel guide pin in the tool kit. Make sure that the wheel guide pin is used, to aid removing and refitting of the road wheel. Failure to do so may result in damage to the vehicle. See TOOL KIT.
Only jack the vehicle using the jacking points described, or damage to the vehicle could occur.
Before raising the vehicle:
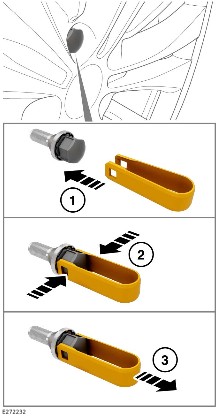
Use the tool to remove the lug bolt covers:

To change a wheel:
Do not allow the jack to contact the sill at any other point, as damage may result.
Avoid rapid, jerky actions, as this may cause the vehicle and jack to become unstable, which may result in an accident, leading to serious injury or death.
Do not lay the wheel on its face, as this may damage the finish.

If it is not possible to torque the lug bolts when a wheel is replaced, set to the correct torque as soon as possible.
If an alloy spare wheel is to be fitted, use a suitable blunt tool to knock the center cap out of the removed wheel. Use hand pressure only to press the center cap into the newly fitted spare.
Check and adjust the tire pressure as soon as possible. See TIRE PRESSURES.
Vehicles supplied with a spare tire have a wheel guide pin in the tool kit. See TOOL KIT.

To change a wheel:
Do not remove the wheel guide pin from the vehicle until the wheel has been lightly tightened with four lug bolts.
Some wheel options on SV vehicles differ in design between the left side and right side of the vehicle.
The full-size spare wheel supplied with the vehicle is designed for use on the passenger's side of the vehicle.
In the event of a puncture, the full-size spare wheel can be used on either side of the vehicle.
The full-size spare wheel should only be used temporarily on the driver's side of the vehicle. Replace the original wheel in its correct location as soon as possible.
If in doubt, contact a retailer/authorized repairer.